VR Shooter Game
UNREAL ASSETS
Documentation
Changing Level Complete UI
This documentation provides instructions on how to change the Level Complete UI in the VR Shooter Game Template. By following these steps, you can modify the Level Complete screen to suit your preferences or design requirements.
- Navigate to the Content/VR_Shooter/Blueprints/
Components directory within the project's content.
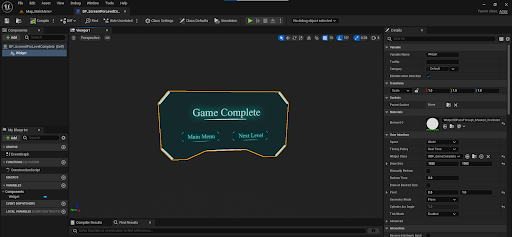
- Locate and open the BP_ScreenForLevelComplete blueprint class. This blueprint is responsible for managing the Level Complete UI.
- Inside the BP_ScreenForLevelComplete blueprint editor, find the widget component. This component represents the UI widget used for the Level Complete screen.
- In the Details panel on the right-hand side of the blueprint editor, locate the property labeled Widget Class.
- Modify the value of the Widget Class property to specify the new UI widget you want to use for the Level Complete screen. This value should be the class of the desired widget blueprint or widget blueprint asset.

- Save the changes you made to the BP_ScreenForLevelComplete blueprint.
- Test your changes by running the VR Shooter Game Template. When the game enters the Level Complete state, it should now display the updated UI widget you specified.
Congratulations! You have successfully changed the Level Complete UI in the VR Shooter Game Template. Feel free to experiment with different UI designs or customize the UI further according to your needs.

